- Product Listings
- Hair
- Hair Dyes
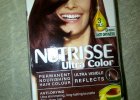
- Review on Garnier Nutrisse 5.25 Frosted Chestnut
Review on Garnier Nutrisse 5.25 Frosted Chestnut
Hot
April 08, 2013
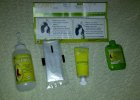
1 applicator bottle of Developer Creme - 60ml 1 tube of nourishing Colour Creme - 40ml 1 bottle of colour nourishing conditioner - 40ml A pair of gloves An instruction Leaflet
User reviews
1 review
Overall rating
5.0
Price
5.0(1)
Quality
5.0(1)
Effectiveness
5.0(1)
Overall rating
5.0
Price
5.0
Quality
5.0
Effectiveness
5.0
When I was younger I had extremely thick healthy hair and I loved experimenting with my hair. I had extensions put in, had waist length braids and even modeled in a hairdressing competing where my lovely locks were dyed white, blue, green and pink and cut in the weirdest style ever!
I've had my share of problems with home dye too, I wanted to go a few shades lighter but most of the time, colour didn't catch on my black locks….
Someone gave me really bad advice…. Get the strongest volume peroxide you can, put it on your hair, and sit in the sun!!!! …. I did it and my hair strands practically broke every time I touched them.
But as you grow older you realize the extent that this damages your hair and instead of going for the outrageous, you tend to look for the healthy.
These days I tend to keep dyeing my hair to a minimum (maybe 2 times a year) and rather focus on keeping it strong. For the past few years I have only been dyeing my hair black which may sound strange but if you are african, indian or asian (GOOD TIP!) dyeing black or dark brown hair black tends to make your hair look healthy as well as make your skin look fairer.
When I received the email from Beauty Bulletin on the different hair colours to choose from I decided to choose 5.25 Frosted Chestnut. The reason I chose this colour was because I didn't want to stray to far from my natural hair colour in case anything went wrong but I also wanted a noticeable change after all the campaign slogan is “Why go unnoticed?”
The most important to do before you colour your hair is make sure that you are well prepared with time and have everything on hand. I have coloured my hair myself many times before so I have a mental checklist that I run through before I begin.
- Box of Hair Dye in Chosen colour
- Newspaper
- Vasaline
- Old T-Shirt
- Hair Clips
Some people like to apply hair dye to clean hair but I prefer applying it to unwashed hair. I find from person experience that the colour tends to catch better. If you don’t have someone to help you, make sure there is a large mirror available for you to use. This takes a lot of guesswork out of sectioning your hair and just makes applying easier. I use to have an old T-shirt to wear when I dye my hair but about 2 years ago I started using an old pajama top of mine (GOOD TIP!) Wearing something with a button up collar protects your neck against most hair dye stains and it is also easier to remove when you want to wash your hair out.
Cover the area that you are going to work with, with lots of old newspaper. I cover the table which I am going to use as well as the floor I am standing on. It may seem a tad much to you but I will never forget trying to get red hair dye off my mum’s tiles in high school. It was a nightmare!!!
Put everything you are going to use on the table. Inside the box is:
1 applicator bottle of Developer Creme - 60ml
1 tube of nourishing Colour Creme - 40ml
1 bottle of colour nourishing conditioner - 40ml
A pair of gloves
An instruction Leaflet
One particularly good feature about the garnier box itself is the box also has a perforated circle push in, when you have mixed your hair dye, you simply push in the circle and place the bottle in the circle as a holder when applying your hair dye to your hair. Also it must be mentioned that the even before you open the Developer or Colour Crème, the most amazing fruity smell is given off. I love it! Some hair dyes give off really strong chemical smells that have my eyes watering even before I apply it to my hair. The fragrance definitely gets my thumbs up and is a good sign.
My Process
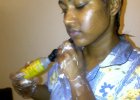
Firstly, I put on my dye shirt. Secondly I gather all my hair and clip it up on my head. Then I begin applying vasaline to my neck face and ears to prevent the hair dye from staining these area’s. I suggest that you apply the vasaline rather generously for adequate protection.
I unscrewed the cap of my developer bottle and pierced the seal of the nourishing Colour Creme with the cap. I squeezed the entire content into the developer bottle. I re-screwed on the lid and shook the bottle for about a minute.
I used the tip of my hair grip to section off a layer of hair at the bottom of my head and clipped the rest up. Next I put on the gloves provided and I begin applying the colour to my hair making sure I cover the roots and work my way to the tips. I was abit skeptical about whether or not I would have enough dye to cover all my hair but there was more then enough.
The instructions tell you to divide your hair into 4 sections and spread the dye but I have thick hair so I prefer unclipping small amounts of hair to make sure that I cover the hair evenly and don’t miss any spots. I really liked the consistency of the hair dye. It was neither runny nor thick and it didn't drip out of my hair.
(GOOD TIP!) When I've squeezed all I can out of the bottle I have a really neat trick to make sure nothing goes wasted. I unscrew the lid and twist my hair together from the bottom up so that it its all gathered in a cone. I then take the bottom part and thread it into the bottle and swirl it around! I know, sounds weird but you will be amazed at how much dye is left in the bottle after you think you done squeezing.
I then combed my hair, made a cup of tea and watched some tv while I waited for about 35 minutes. When the time was up I first went to the mirror, pulled out a strand of hair to check of the colour had caught before I went to wash it. I have had previous incidences where after dyeing my hair, because it is naturally so dark, my hair did not take to the new colour and I have had to wait much longer to see a slight result.
I was really happy to see that there was a definite change in colour!
I got really excited!
I then rinsed my hair with a little bit of water to emulsify the colour, and massaged it in. I then rinsed my hair until the water ran clear. I towel dried my hair and then applied the Nourishing conditioner which was provided to my hair. The conditioner is nice and thick and has an amazing smell too. I massaged it into my hair and left it for a few minutes.
I then went back and rinsed all the conditioner out.
(GOOD TIP!) When rinsing your hair, use cold water for the final rinse. It seals the tips and adds a nice shine.
My hair felt incredible! Sometimes after dyeing your hair, it can feel hard and dry but not this time. It didn’t even feel like I had dyed my hair!!! It felt like I had applied a leave in treatment!
I left my hair to dry naturally and styled it the next morning to see the colour for work.
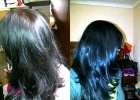
I was amazed that the colour caught so well on my hair, it shined and shimmered in the sun. It looked like I went to a professional and I love it!!
I completely recommend this product to anyone. It didn't damage my hair, I didn't need to apply pre lightner, it doesn't have a bad smell, it wasn't messy or difficult to apply. It added life to my hair.
Its not expensive yet it gives a professional finish!
The new colour is amazing and I love it!
Thank you to Beauty Bulletin and Garnier for giving me the chance to review this product!!!
S


