Review Detail
3.7 1 0.5Overall rating
3.7
Price
5.0
Quality
3.0
Effectiveness
3.0
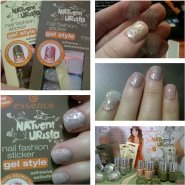
The application process is a simple 5 step process:
1. Clean nails or apply a coat of nail polish - Remember to always apply a base coat first and not to apply a top coat over the colour. The top coat does tend to prevent the sticker from sticking on firmly.
2. Select the correct size for your nail
3. Peel off the sticker from the plastic backing and place sticker on the nail - when the sticker is removed it is quite plyable and can easily be curved to match the curve of you nail. After about 5 minutes the stickers firm up a bit.
4. Press the nail down thoroughly and pay special attention to sticking it down to the very tip of your nail.
5. Cut off the excess with a pair of nail scissors and file off the excess.
I am very impatient with nail polish drying time and hopeless at doing nail art, but I do like the look of it so this product is something that people like me can use to get a nail art look without the hassle. It took me all of 10 minutes to apply the stickers and that was only because I was stopping to take photos of the progress for the collage above. This can easily be done in under 10 minutes.
One thing I really liked about these stickers is that even tough you have something about the same thickness as your nail applied to your nail, it doesn't feel like you have anything stuck onto your nails. It feels very natural and it's only when you touch your nails or look closely that you notice the sticker. So it's something you can use without the hassle of it feeling uncomfortable and unnatural.
The stickers stick down very firmly but can be removed quite easily. Because I didn't place these stickers directly onto my nail the slight bits of glue came off very easily with nail polish remover. I read on the package that even when stuck directly onto bare nails, if there is any glue left on the nail bed it can also be easily removed with nail polish remover.
The stickers last well and I only removed mine because I had meetings to attend where I had to project a more professional image. Even bathing and doing dishes don't affect the stickers too much, but I didn't go too crazy while I had them on.
I am well aware of the fact that Essence caters for a younger market (teenagers and young students), but it doesn't stop me from purchasing a few goodies because they are so affordable, good quality and fun to use.
S
Comments
1 results - showing 1 - 1
Ordering
September 22, 2012
Brought this today after reading your review.. can't wait to try it out... :)
K
krysie
1 results - showing 1 - 1
